
Marks Manager: Manage Classes
This section of the Marks Manager allows for adding and deleting classes. All settings attached to a class apply for all the students within that class. A default class is created upon the first time use of the program. Feel free to rename or delete it. Note that the program requires at least one class to run so if you delete the last class then the Default class will automatically be created again. To add students to a class please use the Manage Students tab.

How to Add a Class
To add a class (or classes), click the purple Add button in the middle of the screen. This brings up a highlighted yellow box on the right hand side of the screen. Class names can be added into this box. Press Enter after each entry to add multiple classes at once. When finished adding classes, click the green Ok button at the bottom of the screen. When complete, class names appear in a list on the left hand side of the screen.
Note: If you add or delete classes while students are logged into the system they will have to log out and in again to see the changes.
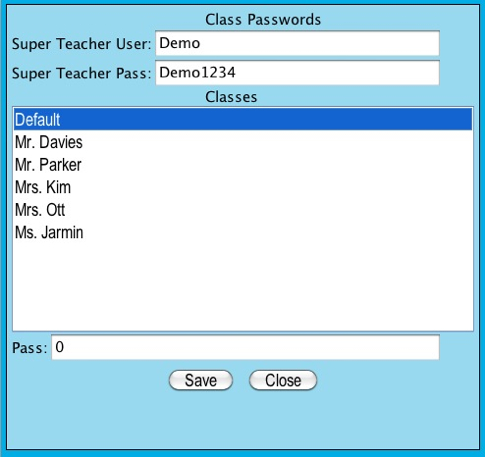
Class Passwords
Clicking on the "Passwords" button at the bottom of the screen brings up this screen, which allows you to change the passwords for individual classes. The "Super Teacher User" and "Super Teacher Pass" fields are to be used as a master login that all classes can use.
How to Delete a Class
To delete a class, click the purple Delete button in the middle of the screen. Once again, a yellow box will appear on the right hand side of the screen with the list of classes within it. Click the class you want to delete and then click the green Ok button at the bottom of the screen.
Note: You will not be able to delete a class if students of that class are currently logged in.
How to Edit Class Settings
To manage settings for an individual class, first select the desired class from the classes list on the left hand side of the screen. Once a class is selected, the class settings menu will open on the right hand side of the screen.
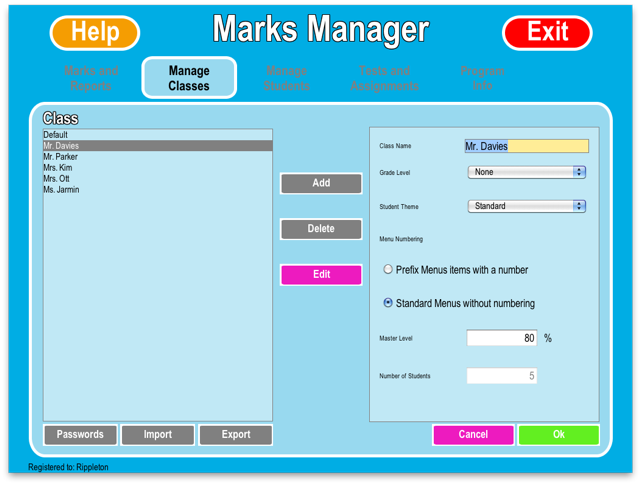
From this window you can change the class name, grade level, student theme, and menu numbering.
Class Name The name of the class students while be grouped into. The students will need to choose this name before choosing their own name when they log into the program.
Grade Level Setting a grade level causes grade appropriate content from within the Student Theme to be used. For example, Grade 1 might have cartoon images for a particular reward where Grade 5 might use photographic sports images for the same reward. The grade level also turns on and off specific system features. For example, if a primary grade is set then menu stars will have happy faces when they are filled and each menu will have a cartoon image on the right side.
Note: Each program has a default grade level that is used if no grade level is set for the class.
Student Theme The Student Theme option allows you to set a graphical theme for the class. Themes change the menu and activity backgrounds, reward media, and interface graphics. Exceptions to theme changes are the Login Screen, Marks Manager, and Summary Screen, which look the same for every theme.
Menu Numbering You can also change the Menu Numbering option which controls whether or not numbers will appear in front of unit and activity names throughout the program. This can be useful for students with reading difficulties.
Mastery Level This setting determines what percentage a student must achieve for an activity to earn a gold star (master it). The default Mastery Level is 80%
Importing And Exporting Students
Marks Manager allows the importing and exporting of the list of classes and students in the Essential Skills Online database. Imported files must be in ASCII delimited spreadsheet format (CSV delimited is recommended). Any delimiting character will work as long as it is not found in the class or student names in the spreadsheet. Exported files are saved in tab delimited spreadsheet format. All contemporary spreadsheet programs support the saving, importing and exporting of CSV and tab delimited spreadsheet format.
Note: Please be aware that exported class lists only contain the class names and student names. If you want to backup the database please use the Admin Tools application that was installed with your program.
Importing Student Lists
To import a list of students from a delimited spreadsheet file, choose Import from the Manage Classes menu. First you will be asked to choose the file to be imported. In the file chooser window, select the import file, and click on Open. You can open folders by double clicking them, and you can select a drive from the drop-down menu at the top of the window.
If the Marks Manager can correctly determine the delimiter character for this file, you will be shown the file layout window. CSV Delimited Text is the recommended file format to import from. The import window provides an opportunity for you to specify how the information in the file will be added to the database. The layout window shows part of the content of the file you choose to import. If this information, displayed in the grid area of the window, is garbled or incorrect, the file did not load properly.
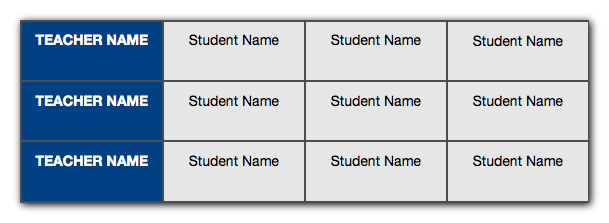
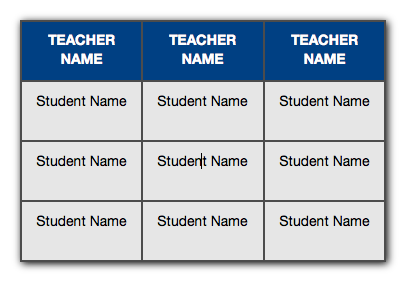
For the importing function to work, the spreadsheet file must have a single row or column, which contains the class name(s). Only one row or column can contain the class name(s). All the other columns and rows should contain the student names. This means, for example, that it is impossible to import two columns of class names from the same spreadsheet. Please see the examples below.
Select the row or column that contains the class names in the large grid area of the layout window by clicking on one of the arrows at the top of the grid to select a column, or clicking on one of the arrows at the left hand side of the grid to select a row. The row or column selected for the class names will highlight. You should see every class name in the spreadsheet highlight. No student names should be highlighted.
The layout window also allows you to ignore the first few rows or columns. Some spreadsheets contain headings or other information that you do not want imported into the Essential Skills student database. To exclude such information, enter the desired number of rows or columns to ignore in the boxes at the bottom of the layout window. The ignored rows or columns will turn gray. Once you have selected a row or column to represent the class names, and once you have set any rows or columns to be ignored, you can click on OK to begin the import.
When the import is complete a message window will appear, showing the results of the import. The number of students added to the database will be displayed here, along with any errors encountered during the import process.
Exporting Student Lists
When you export a student list from the Marks Manager, you are creating a tab delimited spreadsheet file, which contains the names of all the students and classes. The classes will be arranged in the left hand column of the file, and the students in each class will be in the same row as their class name.
To begin the export process, go to the Manage Classes menu and click Export. A file selection window will appear asking for the destination file name to which exported student list will be saved. Use this window to select the name of the export file. Usually it is best to enter a new name for the file, rather than over-writing existing files. If you select an existing file from the file-choosing window, then click Save, all of the contents of the existing file will be lost. If you enter a new file name, and click Save, the file you specified will be created. The export process will begin after clicking Save in the file selection window.