
Marks Manager: Manage Students
This section of the Marks Manager allows for the adding, deleting, and renaming students within classes. Students can also be moved between classes.

A drop-down menu in the upper left-hand corner of the screen allows you to select a class. Once selected, the class' students will appear in a list on the left-hand side of the screen.
You can also deselect any student by clicking on his or her name, with the Control or Command key still held down. If you want to select every student in the current class, just click on the Select All button at the bottom of the screen.
Adding a New Student To add a student to the selected class, click on the purple Add button in the middle of the screen. This brings up a yellow highlighted panel on the right hand side of the screen. Student names can be entered into this panel. To add multiple students, simply press Enter after typing each student's name. When the new student list is complete, click on the Green Ok button at the bottom of the screen.
Once a student is created, his login and password are generated automatically and can be accessed and changed by clicking on the Passwords button.
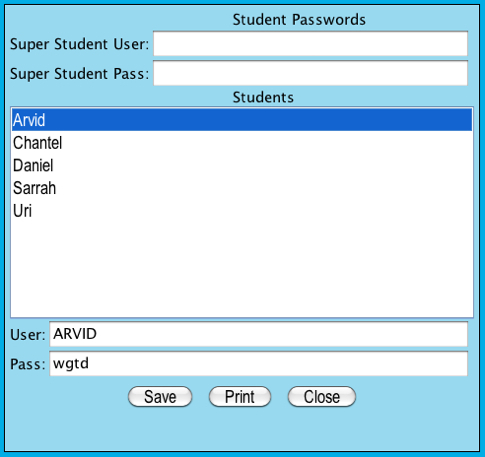
Student Passwords To view a list of all student usernames and passwords, click on the yellow Passwords button at the bottom of the screen. This brings up a menu that lists all current students, their usernames, and their passwords. To display a student's current username and password, highlight their name by clicking on it and they will be displayed at the bottom of the screen. Changing the username and password is simply a matter of replacing what is there and clicking Save. The "Super Student User" and "Super Student Pass" fields are used if a teacher wants the entire class to use the same username and password. If this login method is used, students must choose their name from a list upon logging in.
Deleting Students To delete a student or students, first select the name(s) from the student list on the left-hand side of the screen. Then click on the purple Delete button in the middle of the screen. This brings up a yellow highlighted panel on the right-hand side of the screen. This list shows the names of the students to be deleted. To finish the deletion, click on the green Ok button at the bottom of the screen.
Note: Deleting a student will also delete any work completed by those students.
You can work with multiple students at the same time by selecting more than one student from the student list.
Moving Students Between Classes To move one or more students between classes, you must first select the student(s) that you want to move from the list on the left hand side of the screen. Then click on the purple Move button in the middle of the screen. This brings up a yellow highlighted panel on the right-hand side of the screen that contains the list of existing classes. Click on the class where you want that student to be moved to. Click the green Ok button at the bottom of the screen to complete the move.
Renaming Students To rename a student, first select the student from the list on the left-hand side of the screen. Then click on the purple Rename button in the middle of the screen. This brings up a yellow highlighted panel on the right-hand side of the screen, with the selected student's name in a field. You can rename the student in this field. When you are finished, click the green Ok button at the bottom of the screen.
Note: For students currently logged into the system to see the changes for any of the above operations they will have to first log out of the system and then back in.
Note: You will not be able to move or rename students if those students are using a program.
Active Users Clicking this button displays a list of all students currently active within the system, which class they are in and what program they are using.